
AutoSuggest is a popular and helpful feature in Studio, but it’s a bit erratic (some entries you create are never suggested; the same thing applies to phrases which start with a short word). In addition to a “perfect” AutoSuggest, many users would like to see a function like Word’s AutoCorrection – to have misspellings corrected automatically but also to be able to use automatic replacement of two- or three-letter strings with full words or phrases (e.g. you type “std” and get “standardization”, in accordance with a previously entered replacement).
However, there are at least two applications which not only cater to this need but offer a lot of other useful functions: Phrase Express and AutoHotKey; both can be used together with Studio. AutoHotKey is free, but if you want to use Phase Express for professional purposes, you should purchase a license (USD 49.95 for the standard version) and register your installation.
My initial impression is that both programs are quite powerful and you can do a lot of things besides using them for auto-completion and auto-correction of texts, which is, however, the main functions of interest for the translation work. So far, I find AutoHotKey a bit easier to work with, but PhraseExpress has the added advantage of automatic extraction of recurring phrases which are then suggested in the same way that Studio’s AutoSuggest works.
I shall make a quick run-through of the functions most useful to the translator.
PhraseExpress
Start at the PE feature list (www.phraseexpress.com/features.htm) and look round; then download and try it.
The application, when started, is found in the Taskbar’s system tray . Right-clicking it will produce this menu:

You open the PE window by selecting Edit phrases:
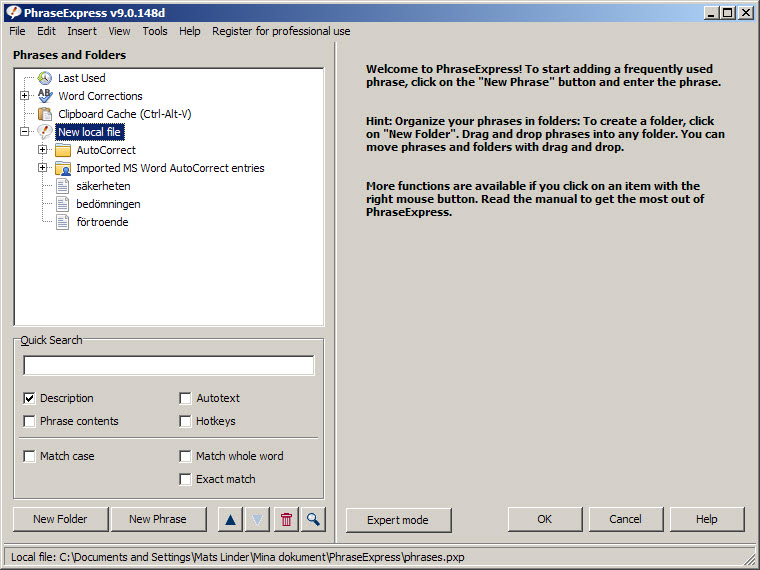
This is where you manage your autotext entries, phrases, hotkeys, etc.; we’ll get back to that. To familiarise yourself with the Help is a good idea, and you can also do that without installing PE: it is here (www.phraseexpress.com/docs9/09/manual.htm#edit).
Note 1: The help text often refers to the Settings option, which you will find on the Tools menu.
Note 2: The PE functions do not work if you have this window open, so after any action performed in it: minimise it or close it.
Text replacement (with Autotext)
- Select the phrase you want PE to insert when you type its “abbreviation”.
- Press Ctrl+Alt+C. The Create new phrase dialog opens:

- Enter a suitable Autotext abbreviation. (The Hotkey option is mainly intended for the execution of macros; see below.)
- Press OK.
When you type the abbreviation and the selected delimiter, the entry in the Description field will be inserted instead.
AutoCorrect
There is no specific auto-correction function; just as in Word, any misspelled word listed as an “abbreviation” will be replaced by its corresponding (correctly spelled) Description. Of course, for this you need a list corresponding to the lists provided with Word, and you need to import it into PE. Depending on language, there are two alternatives:
- Use one of the lists offered by PE: En, De, Nl, Fr, Es, Po, or It
- Import your Word AutoCorrect entries
Import AutoCorrect entries provided by PE
- Open the PE window (right-click the tray icon and select Edit phrases).
- In the Phrases and Folders pane, open the File meny and select Download phrases. The PE site opens with the Free PhraseExpress Add-Ons window.
- Click a suitable AutoCorrect file and save it.
- In the Phrases and Folders pane, select New local file.
- Open the File menu, select Import and then PhraseExpress Phrase File.
- Locate the file you just downloaded (a .pxp file) and open it. Answer Yes to the message window that opens (to avoid duplicate entries).
The result (for English) looks like this:

Import Word AutoCorrect entries
- Open the PE window (right-click the tray icon and select Edit phrases).
- In the Phrases and Folders pane, right-click New local file.
- Select Import and then MS Word AutoCorrect entries. Answer Yes to the message window that opens (to avoid duplicate entries).
- A new folder, Imported MS Word AutoCorrect entries is created, with the imported content.
Should it happen that the import consists of the English list instead of your target language, you need to extract the AutoCorrect entries for that language – see the instructions in the AutoHotKey section below.
Input correction entries with TypoLearn
When you make a manual correction of a typing error, PE registers that as an AutoCorrect entry for future use. (It seems you have make the same correction three times for PE to pick it up.) This applies to single word entries if you have ended them with a space character, then deleted that space with backspace, corrected the word and then again ended it with a space. Entries are stored in the Word Corrections folder.
Text suggestions (AutoComplete)
Here is a potentially very useful function: PE recognises phrases which have occurred three times and stores them for use exactly in the way Studio uses AutoSuggest. It may be a good idea to take a look at the settings for this (Tools > Settings > Text Prediction).
You can also input such phrases from Word documents, sent Outlook emails and the phrases currently loaded into PE: Open Tools > Settings > Text Prediction > Advanced > Learn text.
Note: Despite many tries, I have not been able to make this work on my computer. I am not aware of other complaints to this effect, however, so you may well be more fortunate.
Import an external phrase file
You can import phrase files of your own (e.g. to provide text suggestions for AutoComplete). See the Help file, the section headed Importing an External Bitmap or Text File.
Enable/disable a phrase folder
Obviously, you can have phrase folders with contents in different languages. To avoid possibly confusing AutoCorrections etc., you can disable irrelevant folders: right-click the folder and select Enable Autotext/Hotkeys so that the checkmark disappears.
Clipboard manager
PE has a “clipboard cache” function which saves a number of clipboard contents. By pressing Ctrl+Alt+V, you can select them in a popup menu (and by right-clicking a content you get further options).
Note: For some reason, there is no such default shortcut in my PE installation. I repaired this by selecting, in the PE window, Clipboard Cache and then selecting that key combination (or another one) under Hotkey in the left-hand pane.
Macros
There is an enormous amount of actions you can perform using the macro functions in PE, most of them may not be very useful in Studio, however.
AutoHotKey
Download the program from AutoHotKey (www.autohotkey.com/). When started, it will be placed in the Taskbar’s system tray with this icon . Right-clicking it will produce this menu:

In the Help, start from the top with the AutoHotKey introduction and go on from there. (You can also try jaco0646’s Tutorial for Newbies at www.autohotkey.com/board/topic/44040-tutorial-for-newbies.)
Everything you do with AHK you do in script form; an AHK script is a text file with the extension .ahk. When you start the program, the file AutoHotkey.ahk is created and placed in C:\Documents and Settings\<username>\My documents\AutoHotkey.ahk. You can have as many scripts as you want (e.g. for different target languages), and you can use them together as you please. You create script files in the same way as any other file, so you can place them in any file hierarchy that suits you.
A script can contain a lot of powerful functions, but I shall limit my description to replacements (including corrections) of text strings and a couple of key remappings. You are advised, however, to study the uses of HotKeys and macros; you will find a lot of useful stuff there.
Text replacement
Text replacement is very easily scripted. It looks like this:
::old text::new text
The old text can of course be a commonly misspelled word.
The old text string is case sensitive (but this can be disabled).
Insert text replacement from text
You can insert a shortcut for a text replacement directly from the document you are working in without having to edit the script file. At the end of this page (www.autohotkey.com/docs/Hotstrings.htm) you will find a script to copy and insert in the alphabetically first of the script files you are using. Once you have done this, the shortcut Win+h (or any other shortcut instead of #h at the beginning of this script) will open this pane,

where in this case “however” is the string which will replace whatever abbreviation you inter.
Import Word AutoCorrect entries
In order to import the AutoCorrect entries from Word, you need first to export them:
- Go to Microsoft’s Help and Support page, How to print a listo of AutoCorrect entries in Word (support.microsoft.com/kb/212518).
- Copy the macro code under More information.
- In Word, open the Macros pane with Alt+F8 and press the Create button.
- Press Ctrl+Return at the end of the page and insert the macro copied from the Help and Support page.
- Make sure the insertion point is in the new macro and run it with F5. The AutoCorrect entries are opened in a separate document.
Now you need to edit this document slightly:
- Change the three-column layout into one-column.
- Make substitutions so that each line has the “::old text::new text” look.
Then paste the whole thing into a new or existing .ahk file. (You don’t need to save it in .txt format; it works fine anyway.)
Remapping of keyboard keys
This is a function which I have not been able to find in PhraseExpress. Although not terribly important, I know that it is an answer to a couple of common complaints: How do I get rid of the Capslock and Insert functions, which I almost never use but which are a nuisance when I accidentally hit those keys?
For Capslock, use this line:
CapsLock::Return
or
SetCapsLockState, Off [or AlwaysOff]
And for Insert:
Ins::Return
Note 1: This is according to the instructions. It does not work for me 🙁
Note 2: Of course, you could also program these keys to do something useful but less annoying.
Script Showcase
Take a look at the AutoHotkey Script Showcase (www.autohotkey.com/docs/scripts).


